
Setup Tab
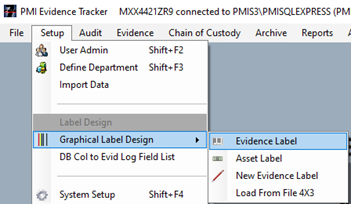
The “Setup” tab (see figure 9) includes the following options: “User Admin”, “Define Department”, “Import Data”, “Graphic Label Design”, “DB Col to Evid Log Field List”, and “System Setup”. This is one of the most important areas on the application and the application admin should have a full understanding of this tab and the options in it.

User admin
The “User Admin” (see figure 10) option under the “Setup” tab is where the administrator will add other users, set or adjust user permissions, and reset passwords (see figure 10). (If your department recycles badge numbers, PMI suggests NOT using badge numbers as the “ID#” for users) Prior to editing a different user in the user field, the admin must save the changes he or she made to the currently selected user. The first user your department should create is a designated user with administrator privileges. The administrator is the individual who will have the responsibility to manage the program and determine what level of access each user will be assigned. The system administrator is the only user who can customize the application and access the setup tab. If your department purchased a “Standard Package” or above, the system accepts an unlimited number of users. With the option of unlimited users, the administrator can add an additional administrator to help cover shift gaps.
To add additional users, select the “Add” button, a new window will appear titled “User Name” (see figure 11)with a box to input a new user name. After entering a new username, then select “OK” to continue.

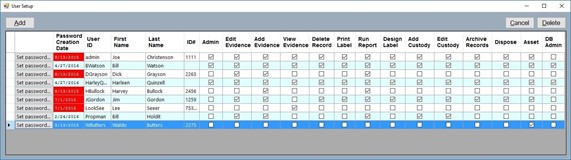
Once the administrator selects “OK” the “User Setup” (see figure 12) will show the new username. The administrator will then need to add a first and last name, or something relative to the department such as “St. Johns” (First Name) and “Sheriff’s Office” (Last Name) for “community users” (common in the basic package with a limit of 2 users) and (optional) “ID#.”

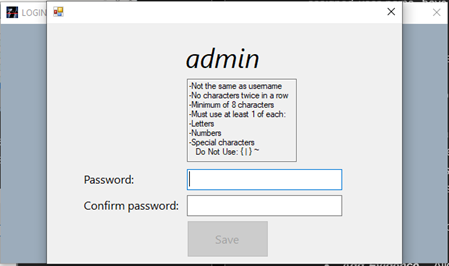
The next step in the process for adding a new user is to grant permissions to which the user will need to perform their duties as desired by the department head. To give a user access to specific parts of the application, check the corresponding permissions box(es). For example, the department head might want to allow a patrol officer to add or “enter” evidence but not access any other areas of the application. By ONLY checking the “Add Evidence” checkbox, that user will have rights to add evidence and no other permissions. Once the administrator has completed setting up the individual, select “Save” and “Set password” to finish adding the user. Then provide that user with their assigned username, have them sign in, and set their password. When the user first tries to log in, they will get an error message “Incorrect password or the User ID ********* does not exist. Try again.” Do not be alarmed, this is the proper error message the application displays for incorrect passwords. The password must contain letters, at least one number, and one special character. Also, the password cannot relate to the username, first name, or last name of the user, and no double numbers (22) or double letters (oo). To save the password, DO NOT use the tab key the user MUST use the mouse on this screen! (See figure 13).
Continue this process until all desired users have access to the application and set their desired permissions or roles. Remember, only the administrator will have access to the “User Setup” screen.
permission definitions
The following list explains their available permissions and their role in the application.
- Admin – The “Admin” permission gives access to all areas of the application, it also allows the user to change the Evidence Log layout, field header names, and edit drop-down lists.
- Add Evidence – The “Add Evidence” permission allows the user to add evidence to the application and print a label for that evidence.
- Edit Evidence – Allows an authorized individual to edit existing records in the Evidence Log.
- View Evidence – Allows an authorized individual to only view evidence records.
- Delete Record – Allows an authorized individual to permanently delete records.
- Print Label – Allows an authorized individual to print labels.
- Run Report – Allows an authorized individual to view and print reports.
- Design Label – Allows an authorized individual to have access to the label design portion of the program where they can design new labels or modify existing ones.
- Add Custody– Allows an authorized individual to check items in and out of the property room using the Custody Log.
- View Custody – Allows an authorized individual to view records in the Custody Log.
- Archive Records – Allows an authorized individual to move inactive records from the active evidence database file to an archive database file.
- Dispose – Allows an authorized individual to tag items of evidence for disposal.
- Asset – Allows an authorized individual access to the “Asset Management” portion on the application.
- DB Admin – Allows an authorized individual to log into the PMI application.
define department
The “Define Department” task should have been completed during the initial install and setup. See “Initial Start-Up” for more information.
Import data
The “Import Data” (see figure 14) option is for a ONE-TIME data import from another SQL database or a csv file into the PMI database and requires a higher-than-average understanding of the PMI application. Please give us a call before attempting this on your own.

The PMI Import Module provides a method to bring evidentiary data into the PMI Evidence Tracker™ application from another source, such as an RMS (Records Management System), by directly connecting to the source (RMS) system database. To connect to the source system database the user will need to know the connection settings: server name, instance name, database name, the correct authentication mode, (either Windows or mixed mode) username and password. The import can operate on a one-time basis or on a continual basis depending on how the process is setup. The import process is tedious and should include a fair amount of thought before attempting to import any data. Give PMI Support a call with any questions.
Steps required to complete the import process are as follows:
- Select the “Setup” tab located on the home screen, then select the “Import Data” option.
- The “Data Import” screen will appear (see figure 14). The user can select one of the four options listed at the top of the screen: “Load Config File,” “Save Config File,” “Database,” and “Delimited.”
- The user can select “Load Config File” which is for loading previously connected database connecting settings.
- There is also an option to “Save Config File.” This option is for saving a set of connection settings after connecting to a database for polling.
- Then there are two radio buttons to choose from, “Database” or “Delimited.”
- Database – If the user selects to use database settings to import data, they will need to enter the correct information in the four boxes: Server Name, Database Name, Instance Name, and choose the authentication then input the correct credentials for the connection settings. If the “Connect” button turns green, then you have successfully connected to that database. If the connect button turns RED, the connection was not established successfully.
- Delimited – The delimited option is for importing data from a .csv file or similar. Simply select the “Delimited” radio button, browse to the correct file, select the type of delimiter, and then, select “Open File”. If the “Open File” button turns green, then you have successfully loaded the .csv file. If the button turns RED, the load was NOT successful.
- Once the user has successfully connected to the database or loaded the .csv file and has selected “OK” (see figure 15). The drop-down fields hold the table names from the database connection or the loaded file. The user performing the import will then need to match the imported data tables with the PMI application data table names (the yellow highlighted tables are required to successfully import data).
- Once the user has completed mapping the table names for the database option, they should select “Save Config File.” This will save the settings for future use if the need arises due to any connection disruption.
- For one-time imports, after matching the table names, the user will need to select the “Import Now” button. It will then turn red until the import has been completed. The user should take a quick screenshot of the table matches in case there is any need to revisit this step in the future.

Graphic Label design
The “Graphical Label Design” application is for visually designing the department’s evidence and asset labels and is accessed under the “Setup” tab (see figure 16).
This area of the application (see figure 17) is used to change what information is printed on the label or remove information not desired on the label.

There is also an option to add a black and white photo of the department’s patch or badge in place of “Your Department Here.” PMI suggests waiting to see what information your department desires on the label before changing it.
Asset label
The “Asset Label” is entirely different from the Evidence Label and has “Property of: ‘Your Dept Here’” and a barcode (see figure 18).

DB col to evid log field list
The “DataBase Column to Evidence Log Field List” is a great aid for users that cannot remember which field headers they changed from. This option, if selected, will populate a window that shows the user the Evidence Log field header names and the database column names side by side (see figure 19). This will help tech support if the user is having any field header issues.

system setup
The PMI Evidence Tracker™ System Setup screen is located under the “Setup” tab on the main screen, (see figure 3) and then, by selecting “System Setup” (see figure 4) located at the bottom of the list. The “System Setup” is where the user can view the path to the evidence, asset, and shelf labels, as well as the path to where the evidence and asset attachment files are located. The user can also run or set a scheduled backup, and perform a database restore.
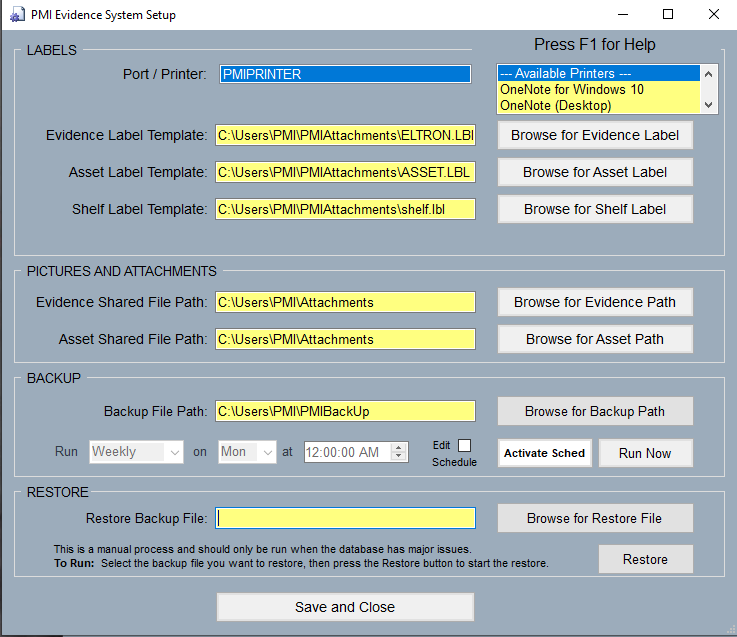
After completing the required information, select “Save and Close.”