The “Change Case Number” option is how the user changes an incorrect case number input into the application. By selecting “Change Case Number,” a screen will appear (see figure 6).
Figure 6
To change a case number, the user can input either a “Tracking Number,” for single items, or by “Case Number” to change a case number for all items in a case. If all the items listed have a green checkmark beside them, the user can successfully change the case number by typing the correct case number in the bottom box and selecting “Save.”
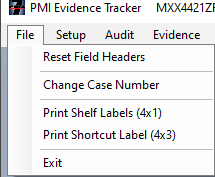
The “File” tab (see figure 5) is located far left on the taskbar on the main screen. Under the file tab are “Reset Field Headers,”“Change Case Number,”“Print Shelf Labels (4×1),”“Print Shortcut Label (4×3),” and “Exit.” If the user does not have the proper permissions, the options are limited under the “File” tab.
Figure 5
Reset field headers
Selecting the “Reset Field Headers” option under the “File” tab, will set the field headers on the Evidence Log back to the default header names, i.e., “CAD Number” will then be changed to “Case Number” which is the default field header name. This will change ALL field header names on the Evidence Log back to default.
Change Case number
The “Change Case Number” option is how the user changes an incorrect case number input into the application. By selecting “Change Case Number,” a screen will appear (see figure 6).
Figure 6
To change a case number, the user can input either a “Tracking Number,” for single items, or by “Case Number” to change a case number for all items in a case. If all the items listed have a green checkmark beside them, the user can successfully change the case number by typing the correct case number in the bottom box and selecting “Save.”
Print shelf labels
The “Print Shelf Labels (4×1)” (see figure 7) option is for printing ALL shelf labels or to print individual labels. If the user would like to “Print All Locations,” which will print all of them automatically. The “Evidence Room Location” list must have the locations listed and saved for this option to work properly.
Figure 7
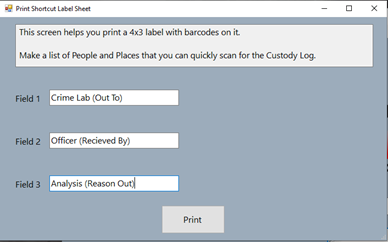
Print Shortcut labels (4×3)
Shortcut labels are best utilized for batching evidence out to someone who takes items often, to place evidence is commonly sent such as “Drug Lab” or “Court House,” and for the same reason.This option enables the user to scan those words into the system instead of typing them.
To create a shortcut label, select “Print Shortcut Labels (4×3)” under the “File” tab, a new window will appear (see figure 8). In this window, the user will enter the information they want to be able to scan.
Figure 8
Exit
The “Exit” option is the best practice for exiting the PMI Evidence Tracker™ application.