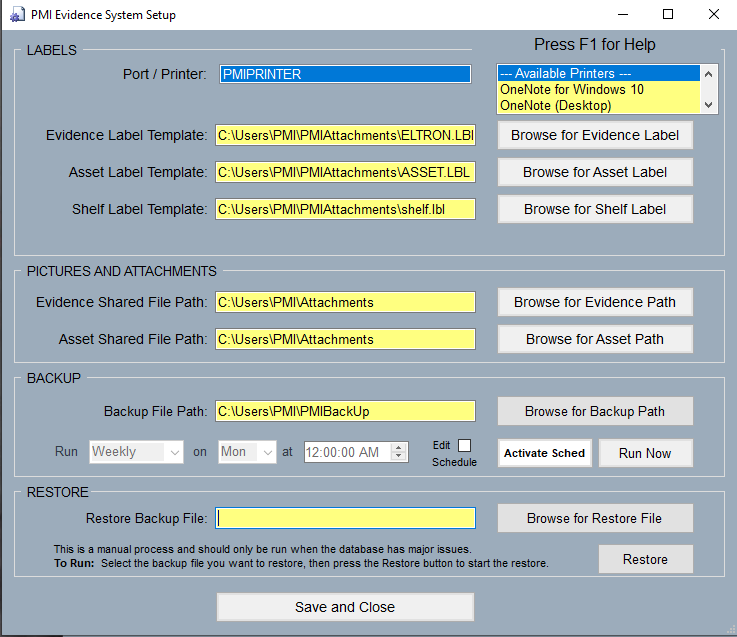
The PMI Evidence Tracker™ System Setup screen is located under the “Setup” tab on the main screen, (see figure 3) and then, by selecting “System Setup” (see figure 4) located at the bottom of the list. The “System Setup” is where the user can view the path to the evidence, asset, and shelf labels, as well as the path to where the evidence and asset attachment files are located. The user can also run or set a scheduled backup, and perform a database restore.
Figure 4
After completing the required information, select “Save and Close.”
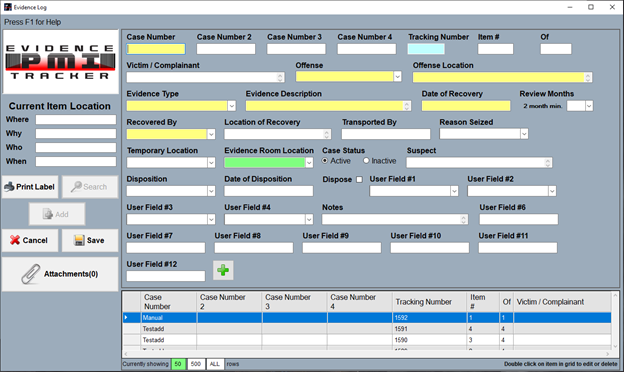
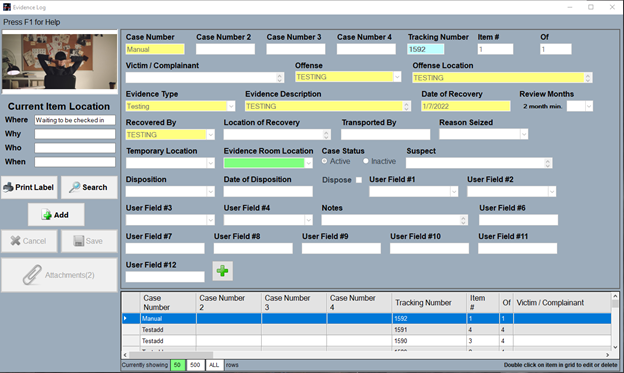
The “Evidence” tab has two options under it, “Log” and “Batch Bin Transfer.” The user can gain access to the “Evidence Log” or “Log” by using the F5 key on the keyboard. The “Evidence Log” (see figure 28) is where the user with administrator permissions can customize the field header names, drop-down lists, and arrange the layout as they desire.
Figure 28
Evidence Log
The “Evidence Log” is the key to the PMI Evidence Tracker™ application. This is the screen users will use to input evidence into the database. This screen is customizable by any user with administrator permissions. Although possible, only one user should be able to customize the “Evidence Log” screen. Things can get very confusing if more than one user is customizing the “Evidence Log.”
Customizing the evidence log
An admin user has the ability to arrange the input fields any way they choose. Most departments arrange this screen to mimic the screen or document the department was previously using to make the transition easier for everyone. The admin user can also re-name the field header names to relate to the current policies for labeling information (see figure 29).
Figure 29
As shown, the “Case Number” was changed to “Incident Number.” To achieve this, the admin user will place the courser over the field header name i.e., “Case Number,” right-click the mouse, and select “Edit Name” then input the desired field header name and hit “Enter” on the keyboard. Once the admin user has re-named all the desired field header names, they will need to select the “X” button at the top right of the “Evidence Log” screen. They will then be prompted with a window informing them the field layout has changed if they would like to save it (see figure 30). Select “Yes.”
Figure 30
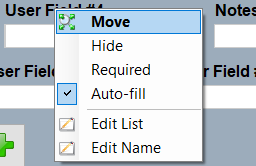
The “Evidence Log” window will then close. Just select “F5” to reopen it. Once the window is open, they admin user can continue customizing the layout. They can arrange fields to their desired layout by right-clicking on the field header name i.e., “Offense” and selecting “Move” (see figure 31).
Figure 31
Once the option to move is active by selecting “Move,” take the courser and left click the desired position in the layout. The relation of the courser is the left position of the field being moved. For example, if the user wants to place “User Field #1” between “Case Number 2” and “Case Number,” the user will place their courser right of “Case Number 2” input field and left of the “Case Number 3” input field. The field will then reside between “Case Number 2” and “Case Number 3” (see figure 32).
Figure 32
Once the admin user has moved the fields to the desired locations on the “Evidence Log,” they will repeat the steps for saving the layout (see figure 31).
On the “Evidence Log” there are 38 input fields, 12 of which are drop-down lists, and 6 of the 38 are expandable fields that allow 100, 250, or 4,000,000 characters.
To edit a drop-down list, the admin will place the mouse courser over the field header name and select “Edit List,” a window will appear (see figure 33) with options to cancel, save, delete, and add. To add information to a list such as a name or a word, select the “Add” option then input the information into the yellow field. Once the user has completed inputting the name, select “Save,” Repeat these steps for all drop-down lists in the PMI application.
Figure 33
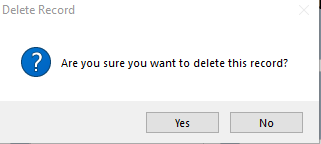
To delete a name or word, select the name from the list, it’ll move to the yellow field, once the desired word is in the yellow field, select “Delete.” The user is prompted with a window asking if they are sure they want to delete this record (see figure 34).
Figure 34
If the information was used in any record, the application will not allow the user to delete the information (see figure 35).
Figure 35
The admin user is also able to “Hide” fields on the layout they believe their department will not be using. These hidden fields are stored at the bottom of the “Evidence Log” layout in a container marked with a green plus (+) symbol (see figure 36).
Figure 36
By selecting the green plus (+) symbol, a table will appear with a list of the hidden fields (see figure 37).
Figure 37
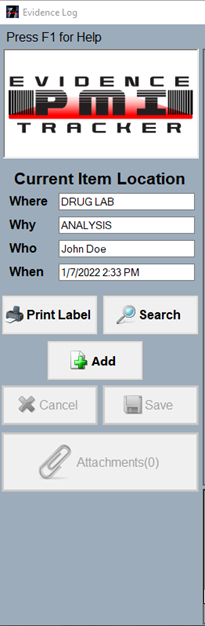
The left pane (see figure 38) of the “Evidence Log” the user will see our logo (attachment thumbnail), “Current Item Location” information, and six option buttons: “Print Label,” “Search,” “Add,” “Cancel,” “Save,” and “Attachments (0).”
Figure 38
Logo
Our logo at the top left corner of the “Evidence Log,” if the user attaches a photograph to the evidence record, the logo (see figure 39) will then be replaced with a thumbnail of the attached image.
Figure 39
Current item location
The “Current Item Location” information displays (see figure 40); “Where” the item is located in relation to the information in the application; “Why” the item is in that location; “Who” had possession of the item last, or currently has possession of the item; “When” When it was taken or stored.
Figure 40
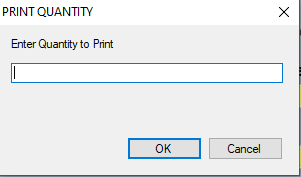
The “Print Label” option allows a user with the correct permissions to print an evidence label (see figure 41). Also, when a user adds a piece of evidence in the “Evidence Log” and saves it, they are prompted (see figure 41) to select the number of labels they want printed for that piece of evidence.
Figure 41
Search
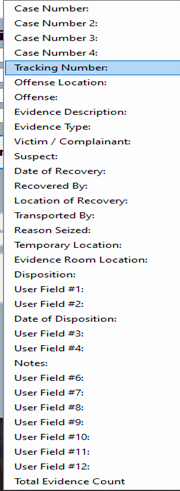
The “Search” button is where ALL users should conduct their searches in the PMI application. Once the “Search” button has been selected, a screen will appear that the user will use to select by which does the user want to search, i.e., “Case Number,” “Tracking Number,” “Evidence Type,” etc. (See figure 42).
Figure 42
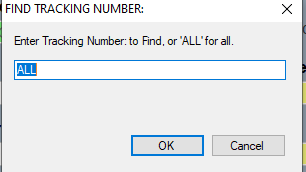
After selecting an option from the list (notice “Total Evidence Count” at the very bottom) a window will appear asking for the user to specify the data they want to search for (see figure 43).
Figure 43
Once the user inputs the desired information in the search bar and selects “OK,” the results will display at the bottom of the “Evidence Log” in the matrix table (see figure 35). I elected to search by “Tracking Number” and input “1500” into the search bar, then selected “OK.” The results were then displayed at the bottom of the window in the matrix (see figure 44). This is a great tool for editing records, the user can search by “Case Number” which will display ALL of the records with the case number the user entered in the search box. With only the results showing at the bottom in the matrix, the user can easily edit the record and move to the next seamlessly.
Figure 44
Add
The “Add” option will open a new, blank record (see figure 45) for the user to input data. The PMI application associates items with the case number. If a user inputs a case number of “2022-01152458,” inputs data in the required (yellow highlighted) fields, then saves the record. If the user opens a new, blank record, then inputs the same case number (2022-01152458), all fields with the “Auto-fill” option selected, will auto-populate information from the previous record that was saved.
Figure 45
Cancel
If at any time the user is uncertain the information, they input is accurate, the user can simply select the “Cancel” option and cancel the record. This feature is also utilized during emergencies. In some department a patrol officer also has the role of Evidence Tech and when a call comes in, they must drop everything and go. The “Cancel” button will help keep the database clean from any errors or missing/inaccurate information. The “Cancel” button, like the “Save” button is only operational when a record is being edited (see figure 45).
Save
The “Save” option is used when the user has completed entering the information required by their department or they have completed the record edits.
attachments
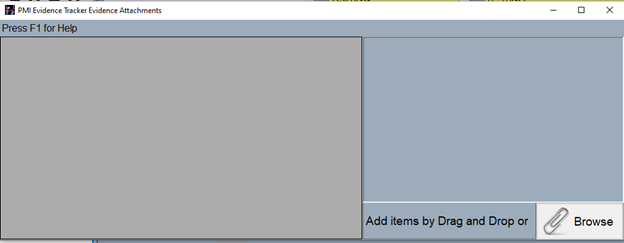
The “Attachments” option (see figure 45) is used to attach documents, picture, audio and video recordings, or pdfs and shows the total number of attachments to that record. Once the user selects the “Attachments” option, a new window will appear (see figure 46). The user can add numbers by “Dragging and Dropping” a file into the gray space on the window shown in figure 46 or the user can browse to the file in its folder location. If the user has successfully attached a file, they will see them listed in the gray space (see figure 47).
Figure 46
Figure 47
The record will then display a photo at the top left (see figure 48) in the “Evidence Log” if a photo is selected as the default as shown in figure 47.
Figure 48
display grid
The grid (see figure 49) at the bottom of the “Evidence Log” lists, by default, the last “50” records recorded into the application. There are also two other options “500” and “ALL,” that will display 500 of the last records or “ALL” of the last records. This is also where the user will view records and edit records.
To view a record, locate the desired record by using the “Search” option as explained under the “Search” heading. Once the user has located the desired record, simply click once to view the information in the record.
To edit a record the user must first have edit permission then they must locate the record, once located, double click the desired record to edit it.
Figure 49
Entering evidence
The “Evidence Log,” modeled after the commonly used evidence bag to facilitate moving from a paper system to a computer application. Once a user selects “Log” under the “Evidence” tab, the “Evidence Log” will appear with information from the last record input into the application. To enter a new record, the user will need to select the “Add” option from the left pane area. After selecting “Add,” then the “Add” option will appear grayed out, then “Cancel” and “Save” will then become selectable (see figure 28). The user will start by inputting a “Case Number” then hit the “Tab” key on the keyboard to move to the next field. (Remember the “Tracking Number,” “Item#” and “Item Of” will auto-fill by the application.)
The next required field (as indicated by the yellow shaded box) is “Offense.” The user will then need to input information into “Offense” which is a drop-down list in which the user can select a preadded offense (If the admin user added the offenses to the drop-down list the user should not enter a new word or phrase).
There are 7 fields that require information to save a record: “Case Number,” “Offense,” “Offense Location,” “Evidence Type,” “Evidence Description,” “Date of Recovery,” and “Recovered By.” If one of these fields is missing data, the user cannot save the record. Please refer to the “Evidence Log” then “Evidence Log Fields” for the data character limits for each field.
Case Number
The “Case Number”field will accept up to 20 characters and is the number that determines the “Item#” and “Of” i.e., “Item#”_2_ “Of” _3_ . The application provides fields for additional case numbers such as, “Case Number 2,” “Case Number 3,” and “Case Number 4.” These fields can be used for additional case numbers or can be renamed and repurposed for other needs. These fields can also be used to input another case number assigned by an outside entity such as the “ATF.”
tracking number
The “Tracking Number” is a unique number that is automatically generated by the application. The “Tracking Number” is unique, will never be duplicated, and cannot be manipulated. The “Tracking Number” ensures the integrity of the PMI application. The “Tracking Number” is not assigned until a record is saved.
Item number
The “Item#” indicates what item the user is currently viewing, adding, or editing as the “Of” number is automatically adjusted as items are added to a case number. These numbers correlate with the case number. If an item input has the same case number, the “Item# and Of” will adjust as pieces are added.
victim/complainant
The “Victim/Complainant” field is an expandable field for the user to input a name and an address or two names and an address.
offense
The “Offense” field is a drop-down list that the admin user will populate with data for officers to choose from. The admin user building the list for officers to choose from helps keep the database clean and uniform.
offense location
The “Offense” field is a drop-down list that the admin user will populate with data for officers to choose from. The admin user building the list for officers to choose from helps keep the database clean and uniform.
offense location
The “Offense Location” is an expandable field where the user will input the address where the offense occurred or a description of the location if no address is available.
evidence type
The “Evidence Type” field is a drop-down field, and the admin user will populate the list with evidence types the department commonly encounters. (The admin user can add to the list, but no evidence type assigned to a record can be removed from the list, the application will not allow it.
Figure 50
Figure 51
Figure 52
Figure 53
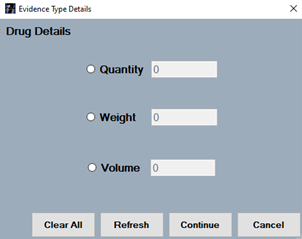
The “Drug Details,” (see figure 50)which populates by selecting “Drugs” in the “Evidence Type,” is where the user can select one of the listed options (Quantity, Weight, Volume) to better describe the drug evidence collected. The corresponding boxes are for inputting the value of the selected option i.e., Quantity [100] or Quantity [100 pills], Weight [.25] or Weight [.25 oz], Volume [2 Tbs] or Volume [2 tbsp].
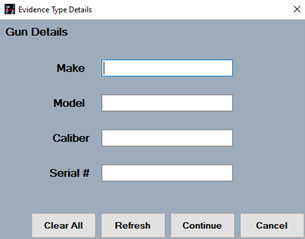
The “Gun Details,” (see figure 51) which populates by selecting “Guns” in the “Evidence Type,” is where the user can input data for “Make,” “Model,” Caliber,” and “Serial Number.”
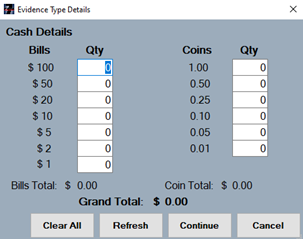
The “Cash Details,” (see figure 52) which populates by selecting “Cash” in the “Evidence Type,” is where the user can input the number of each denomination collected, i.e., $100 (3), $20 (6), $5 (13). The “Cash Details” window will add all the input denomination and present the user with a “Bill Total, Coin Total, and Grand Total.”
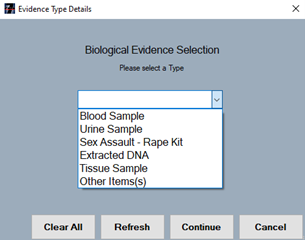
The “Biological Details,” (see figure 53) which populates by selecting “Biological” in the “Evidence Type,” is where the user can select one of 6 options from the drop-down list provided i.e., “Blood Sample, Urine Sample, Sexual Assault – Rape Kit, Extracted DNA, Tissue Sample, Other Item(s).”
Evidence Description
The “Evidence Description” field will accept more than 4 million characters and is best used to describe, in more detail, the evidence collected. Please understand, the “Evidence Type” should be a simple word to describe the evidence, i.e., “Drugs.” user to list the finer details of the evidence collected and will accept as many as 4 million characters.
date of recovery
The “Date of Recovery” must be entered in a mm/dd/yyyy format, the user can also add a time in the format of hh:mm if desired. The date and time pertain to when that piece of evidence was collected. The time can be entered in a regular or military configuration. If military time is used, it will be converted into regular time and the appropriate AM/PM designation will be added when the record is saved. If the user is using regular time, be sure to add the AM or PM. Otherwise, the application will. by default, save the record with an AM time.
review months
The “Review Months” field is used for assigning a “timer” to a piece of evidence the user wants to review for purging when the timer expires. This is a great tool designed to help users purge items from the evidence/property room and should be utilized.
recovered by
The “Recovered By” field is for the name of the individual who collected that piece of evidence. This is a drop-down field the admin can add names to but can also accept free text. The user can type the first 2 characters of a name from the drop-down, and it will auto-fill the selection, or the user can choose directly from the drop-down list.
location of recovery
The “Location of Recovery” field is a detailed description of the specific location where the evidence was collected. The user should input an address or a description of the location where the evidence was collected.
transported by
The “Transported By” field is for the name of the person transporting that piece of evidence from where it was collected to the temporary or permanent storage location.
reason seized
The “Reason Seized” field is for entering the reason for which that piece of property is being retained, i.e., to be tested, holding for court, etc. This is a drop-down field but can also accept free text. Remember, free text can pollute the data with multiple entries spelled differently. The user can enter the first 2 characters of a word from the drop-down list, and it will auto-fill, or the user can choose an option directly from the drop-down list.
temporary location
The “Temporary Location” field is a drop-down list the admin will populate with the temporary location officers use to store evidence in before it is accepted into the evidence/property room by the evidence tech. The user can enter the first 2 characters of a location from the drop-down list, and it will auto-fill, or the user can choose a location from the drop-down list.
evidence room location
The “Evidence Room Location” field is a drop-down list containing all locations in the evidence/property room. When an evidence/property room custodian collects a piece of evidence from the temporary location and verifies the information and evidence, they will then assign that evidence a location it will be stored in the evidence/property room. Assigning a location to a piece of evidence in the “Evidence Log” then saving that record, will simultaneously enter the record into the “Evidence Log” and log its first chain of custody record into the PMI Evidence Tracker™ application.
case status
The “Case Status” field has two options, “Active” or “Inactive.” These two radio buttons indicate whether a case is active or inactive, the default setting is “Active.” After data is entered for a particular piece of evidence and then saved, that evidence is now officially an “Active” piece of evidence.
suspect
The “Suspect” field is for recording the name, address, and other important information pertaining to the suspect(s).
disposition
The “Disposition” field is a drop-down list and is used to designate how evidence is to be disposed of when a case is closed and the evidence is no longer needed, or when an item is to be returned to its owner. The admin will need to populate the list with options used often by your department.
date of disposition
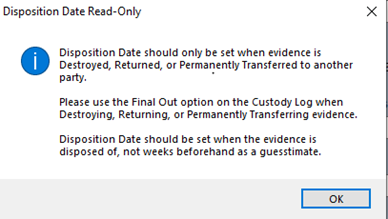
The “Date of Disposition” is a field the application automatically inputs a date and the time of when a piece of evidence was set to “Final Out.” This is something we will cover in the “Chain of Custody” tab of the PMI application. If a user tries to input a date and time into the “Data of Disposition” field they will get a message (see figure 54).
Figure 54
Dispose
The “Dispose” field (see figure 55) is an option that a user can select after it has been determined that the evidence is no longer needed and is ready to be permanently removed from the evidence room. By selecting “Dispose” the user can run a report listed in the “Reports” tab that will report all items that have “Dispose” selected.
Figure 55
user fields
The fields labeled “User Field #1 – #4”are drop-down fields in the “Evidence Log” that function like the other drop-down fields where the list can be edited to fit the department’s needs as well as the header name. This allows for the admin to re-purpose the fields as needed. “User Fields #6 – #12”are text fields that scroll and are available for re-purposing by the admin user.
notes
The “Notes” field is a free text field for inputting notes relative to the piece of evidence currently open in the “Evidence Log,” information concerning that piece of evidence, or notes pertaining to the case.
The “Assets” tab is how the user will access the “Asset Log” module of the application. The “Assets Log” is designed similarly to the “Evidence Log.” This feature is available for anyone with “Asset” permissions and has 4 new tabs to choose from (Setup, Reports, Archive, and Help).
The “Assets Log” (see figure 96)is the primary input screen for assets and the heart of the asset management portion of the PMI Evidence Tracker™ application. All property is logged neatly and systematically into the program, ensuring that each piece of equipment is managed in a consistent and accurate manner. Information on an asset, its location, and to whom it is assigned can be quickly produced on demand.
Figure 96
Notice the “Asset Log” uses a simple, one-screen format for entering data as well as seven options listed in the left pane, i.e., “Print Label,”“Find,”“Delete,”“Add,”“Cancel,”“Save,” and “Attachments” as in the “Evidence Log.”
Customizing the asset log
To customize the “Asset Log” the user must have “Administrator” permission. The customization process of the “Asset Log” is identical to the “Evidence Log.”Please refer to the process for customizing the “Evidence Log” as a guide to customizing the Asset Log.
Entering Assets
When the user first access the “Asset Log,” they will notice that some fields are shaded yellow. All yellow shaded fields are mandatory and must be filled in before a record can be saved. The user can move from field to field in this screen either by pressing the “Tab” key or by selecting the desired field.
Setup
The “Setup” tab is where the user can reset the field headers by selecting “Reset Field Headers.”
Asset reports
The “Reports” tab (see figure 97) will list all preloaded “Asset” reports. (Asset List, Archived Asset List, Asset Category Report, Asset Receipt, Audit Report, and Express Custom Reports (which will open the same Express Custom Reports as the reports tab on the main screen)).
Figure 97
asset list
The “Asset List” report (see figure 98) generates a report that displays all assets entered in the “Asset Log.” The report will also show items that have been “Liquidated.”
Figure 98
Archived asset list
The “Archived Asset List” report (see figure 99) will display all assets that have been archived. The report will also show all information regarding that asset, it will also show the date it was liquidated.
Figure 99
asset category report
The “Asset Category Report” will populate a new window (see figure 100). This window will display a list of the department’s asset category. The user will then select a category from the list that they wish to recall information about.
Figure 100
After they select a category and select “Report” a report will populate showing all items under the category that are active (see figure 101).
Figure 101
asset receipt
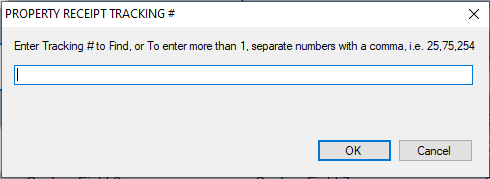
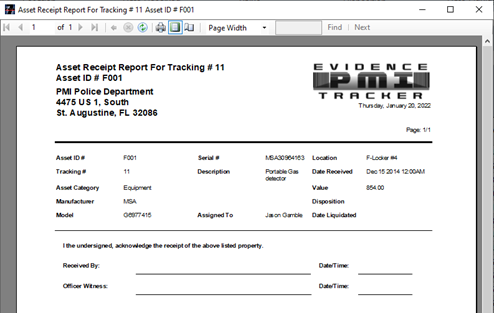
The “Asset Receipt” report (see figure 103) will produce a receipt much like the property receipt in the evidence portion of the application. When the user wants to print a receipt for an asset, they will select this option which will populate a window (see figure 102) where the user can input the tracking number of the item they wish to print a receipt for.
102
Figure 103
Asset Audit Report
The “Audit Report” (see figure 105) in the “Asset” module area of the application if selected will populate a window (see figure 104) for the user to input their desired audit parameters. The report is for a user to print and conduct a hand audit of the assets.
104
105
archive
To archive an asset, the user must first edit the record and add “Date Liquidated.” If there is no date for the “Date Liquidated” the item will not show in the archive list (see figure 106) to be archived.
Figure 106
The system will not show an item in the list of assets to be archived if the “Date Liquidated” has not been entered. To move an item from active to an archive, double click an asset to archive and then select “Archive One.” If the user wants to archive all the items listed in the “Archive Case” list, select “Archive All.” Once completed, the item will be PERMANENTLY removed from Assets. The user can view the archive database at any time by running “Archived Asset List Report.”
The “Setup” tab (see figure 9) includes the following options: “User Admin”, “Define Department”, “Import Data”, “Graphic Label Design”, “DB Col to Evid Log Field List”, and “System Setup”. This is one of the most important areas on the application and the application admin should have a full understanding of this tab and the options in it.
Figure 9
User admin
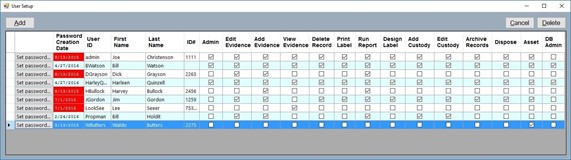
The “User Admin” (see figure 10) option under the “Setup” tab is where the administrator will add other users, set or adjust user permissions, and reset passwords (see figure 10). (If your department recycles badge numbers, PMI suggests NOT using badge numbers as the “ID#” for users) Prior to editing a different user in the user field, the admin must save the changes he or she made to the currently selected user. The first user your department should create is a designated user with administrator privileges. The administrator is the individual who will have the responsibility to manage the program and determine what level of access each user will be assigned. The system administrator is the only user who can customize the application and access the setup tab. If your department purchased a “Standard Package” or above, the system accepts an unlimited number of users. With the option of unlimited users, the administrator can add an additional administrator to help cover shift gaps.
Figure 10
To add additional users, select the “Add” button, a new window will appear titled “User Name” (see figure 11)with a box to input a new user name. After entering a new username, then select “OK” to continue.
Figure 11
Once the administrator selects “OK” the “User Setup” (see figure 12) will show the new username. The administrator will then need to add a first and last name, or something relative to the department such as “St. Johns” (First Name) and “Sheriff’s Office” (Last Name) for “community users” (common in the basic package with a limit of 2 users) and (optional) “ID#.”
Figure 12
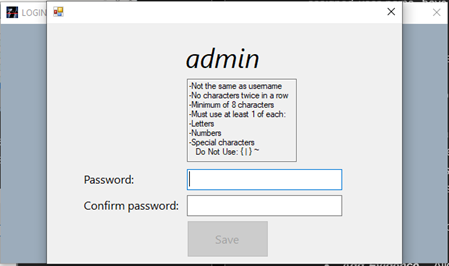
The next step in the process for adding a new user is to grant permissions to which the user will need to perform their duties as desired by the department head. To give a user access to specific parts of the application, check the corresponding permissions box(es). For example, the department head might want to allow a patrol officer to add or “enter” evidence but not access any other areas of the application. By ONLY checking the “Add Evidence” checkbox, that user will have rights to add evidence and no other permissions. Once the administrator has completed setting up the individual, select “Save” and “Set password” to finish adding the user. Then provide that user with their assigned username, have them sign in, and set their password. When the user first tries to log in, they will get an error message “Incorrect password or the User ID ********* does not exist. Try again.” Do not be alarmed, this is the proper error message the application displays for incorrect passwords. The password must contain letters, at least one number, and one special character. Also, the password cannot relate to the username, first name, or last name of the user, and no double numbers (22) or double letters (oo). To save the password, DO NOT use the tab key the user MUST use the mouse on this screen! (See figure 13).
Figure 13
Continue this process until all desired users have access to the application and set their desired permissions or roles. Remember, only the administrator will have access to the “User Setup” screen.
permission definitions
The following list explains their available permissions and their role in the application.
Admin – The “Admin” permission gives access to all areas of the application, it also allows the user to change the Evidence Log layout, field header names, and edit drop-down lists.
Add Evidence – The “Add Evidence” permission allows the user to add evidence to the application and print a label for that evidence.
Edit Evidence – Allows an authorized individual to edit existing records in the Evidence Log.
View Evidence – Allows an authorized individual to only view evidence records.
DeleteRecord – Allows an authorized individual to permanently delete records.
Print Label– Allows an authorized individual to print labels.
Run Report – Allows an authorized individual to view and print reports.
Design Label – Allows an authorized individual to have access to the label design portion of the program where they can design new labels or modify existing ones.
Add Custody– Allows an authorized individual to check items in and out of the property room using the Custody Log.
View Custody – Allows an authorized individual to view records in the Custody Log.
Archive Records – Allows an authorized individual to move inactive records from the active evidence database file to an archive database file.
Dispose – Allows an authorized individual to tag items of evidence for disposal.
Asset – Allows an authorized individual access to the “Asset Management” portion on the application.
DB Admin – Allows an authorized individual to log into the PMI application.
define department
The “Define Department” task should have been completed during the initial install and setup. See “Initial Start-Up” for more information.
Import data
The “Import Data” (see figure 14) option is for a ONE-TIME data import from another SQL database or a csv file into the PMI database and requires a higher-than-average understanding of the PMI application. Please give us a call before attempting this on your own.
Figure 14
The PMI Import Module provides a method to bring evidentiary data into the PMI Evidence Tracker™ application from another source, such as an RMS (Records Management System), by directly connecting to the source (RMS) system database. To connect to the source system database the user will need to know the connection settings: server name, instance name, database name, the correct authentication mode, (either Windows or mixed mode) username and password. The import can operate on a one-time basis or on a continual basis depending on how the process is setup. The import process is tedious and should include a fair amount of thought before attempting to import any data. Give PMI Support a call with any questions.
Steps required to complete the import process are as follows:
Select the “Setup” tab located on the home screen, then select the “Import Data” option.
The “Data Import” screen will appear (see figure 14). The user can select one of the four options listed at the top of the screen: “Load Config File,” “Save Config File,” “Database,” and “Delimited.”
The user can select “Load Config File” which is for loading previously connected database connecting settings.
There is also an option to “Save Config File.” This option is for saving a set of connection settings after connecting to a database for polling.
Then there are two radio buttons to choose from, “Database” or “Delimited.”
Database – If the user selects to use database settings to import data, they will need to enter the correct information in the four boxes: Server Name, Database Name, Instance Name, and choose the authentication then input the correct credentials for the connection settings. If the “Connect” button turns green, then you have successfully connected to that database. If the connect button turns RED, the connection was not established successfully.
Delimited – The delimited option is for importing data from a .csv file or similar. Simply select the “Delimited” radio button, browse to the correct file, select the type of delimiter, and then, select “Open File”. If the “Open File” button turns green, then you have successfully loaded the .csv file. If the button turns RED, the load was NOT successful.
Once the user has successfully connected to the database or loaded the .csv file and has selected “OK” (see figure 15). The drop-down fields hold the table names from the database connection or the loaded file. The user performing the import will then need to match the imported data tables with the PMI application data table names (the yellow highlighted tables are required to successfully import data).
Once the user has completed mapping the table names for the database option, they should select “Save Config File.” This will save the settings for future use if the need arises due to any connection disruption.
For one-time imports, after matching the table names, the user will need to select the “Import Now” button. It will then turn red until the import has been completed. The user should take a quick screenshot of the table matches in case there is any need to revisit this step in the future.
Figure 15
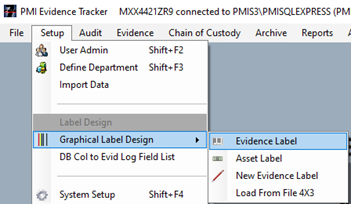
Graphic Label design
The “Graphical Label Design” application is for visually designing the department’s evidence and asset labels and is accessed under the “Setup” tab (see figure 16).
Figure 16
This area of the application (see figure 17) is used to change what information is printed on the label or remove information not desired on the label.
Figure 17
There is also an option to add a black and white photo of the department’s patch or badge in place of “Your Department Here.” PMI suggests waiting to see what information your department desires on the label before changing it.
Asset label
The “Asset Label” is entirely different from the Evidence Label and has “Property of: ‘Your Dept Here’” and a barcode (see figure 18).
Figure 18
DB col to evid log field list
The “DataBase Column to Evidence Log Field List” is a great aid for users that cannot remember which field headers they changed from. This option, if selected, will populate a window that shows the user the Evidence Log field header names and the database column names side by side (see figure 19). This will help tech support if the user is having any field header issues.
Figure 19
system setup
The PMI Evidence Tracker™ System Setup screen is located under the “Setup” tab on the main screen, (see figure 3) and then, by selecting “System Setup” (see figure 4) located at the bottom of the list. The “System Setup” is where the user can view the path to the evidence, asset, and shelf labels, as well as the path to where the evidence and asset attachment files are located. The user can also run or set a scheduled backup, and perform a database restore.
Figure 4
After completing the required information, select “Save and Close.”
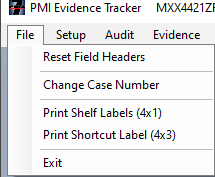
The “File” tab (see figure 5) is located far left on the taskbar on the main screen. Under the file tab are “Reset Field Headers,”“Change Case Number,”“Print Shelf Labels (4×1),”“Print Shortcut Label (4×3),” and “Exit.” If the user does not have the proper permissions, the options are limited under the “File” tab.
Figure 5
Reset field headers
Selecting the “Reset Field Headers” option under the “File” tab, will set the field headers on the Evidence Log back to the default header names, i.e., “CAD Number” will then be changed to “Case Number” which is the default field header name. This will change ALL field header names on the Evidence Log back to default.
Change Case number
The “Change Case Number” option is how the user changes an incorrect case number input into the application. By selecting “Change Case Number,” a screen will appear (see figure 6).
Figure 6
To change a case number, the user can input either a “Tracking Number,” for single items, or by “Case Number” to change a case number for all items in a case. If all the items listed have a green checkmark beside them, the user can successfully change the case number by typing the correct case number in the bottom box and selecting “Save.”
Print shelf labels
The “Print Shelf Labels (4×1)” (see figure 7) option is for printing ALL shelf labels or to print individual labels. If the user would like to “Print All Locations,” which will print all of them automatically. The “Evidence Room Location” list must have the locations listed and saved for this option to work properly.
Figure 7
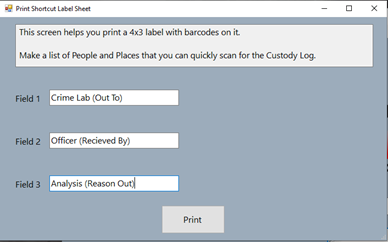
Print Shortcut labels (4×3)
Shortcut labels are best utilized for batching evidence out to someone who takes items often, to place evidence is commonly sent such as “Drug Lab” or “Court House,” and for the same reason.This option enables the user to scan those words into the system instead of typing them.
To create a shortcut label, select “Print Shortcut Labels (4×3)” under the “File” tab, a new window will appear (see figure 8). In this window, the user will enter the information they want to be able to scan.
Figure 8
Exit
The “Exit” option is the best practice for exiting the PMI Evidence Tracker™ application.
The “Evidence Log,” modeled after the commonly used evidence bag to facilitate moving from a paper system to a computer application. Once a user selects “Log” under the “Evidence” tab, the “Evidence Log” will appear with information from the last record input into the application. To enter a new record, the user will need to select the “Add” option from the left pane area. After selecting “Add,” then the “Add” option will appear grayed out, then “Cancel” and “Save” will then become selectable (see figure 28). The user will start by inputting a “Case Number” then hit the “Tab” key on the keyboard to move to the next field. (Remember the “Tracking Number,” “Item#” and “Item Of” will auto-fill by the application.)
The next required field (as indicated by the yellow shaded box) is “Offense.” The user will then need to input information into “Offense” which is a drop-down list in which the user can select a preadded offense (If the admin user added the offenses to the drop-down list the user should not enter a new word or phrase).
There are 7 fields that require information to save a record: “Case Number,” “Offense,” “Offense Location,” “Evidence Type,” “Evidence Description,” “Date of Recovery,” and “Recovered By.” If one of these fields is missing data, the user cannot save the record. Please refer to the “Evidence Log” then “Evidence Log Fields” for the data character limits for each field.
Case Number
The “Case Number”field will accept up to 20 characters and is the number that determines the “Item#” and “Of” i.e., “Item#”_2_ “Of” _3_ . The application provides fields for additional case numbers such as, “Case Number 2,” “Case Number 3,” and “Case Number 4.” These fields can be used for additional case numbers or can be renamed and repurposed for other needs. These fields can also be used to input another case number assigned by an outside entity such as the “ATF.”
Tracking
The “Tracking Number” is a unique number that is automatically generated by the application. The “Tracking Number” is unique, will never be duplicated, and cannot be manipulated. The “Tracking Number” ensures the integrity of the PMI application. The “Tracking Number” is not assigned until a record is saved.
Item Number
The “Item#” indicates what item the user is currently viewing, adding, or editing as the “Of” number is automatically adjusted as items are added to a case number. These numbers correlate with the case number. If an item input has the same case number, the “Item# and Of” will adjust as pieces are added.
Victim/Complaint
The “Victim/Complainant” field is an expandable field for the user to input a name and an address or two names and an address.
Offense
The “Offense” field is a drop-down list that the admin user will populate with data for officers to choose from. The admin user building the list for officers to choose from helps keep the database clean and uniform.
Offense Location
The “Offense Location” is an expandable field where the user will input the address where the offense occurred or a description of the location if no address is available.
Evidence Type
The “Evidence Type” field is a drop-down field, and the admin user will populate the list with evidence types the department commonly encounters. (The admin user can add to the list, but no evidence type assigned to a record can be removed from the list, the application will not allow it.
Biological
The “Biological Details,” (see figure 54) which populates by selecting “Biological” in the “Evidence Type,” is where the user can select one of 6 options from the drop-down list provided i.e., “Blood Sample, Urine Sample, Sexual Assault – Rape Kit, Extracted DNA, Tissue Sample, Other Item(s).”
Figure 54
Cash
The “Cash Details,” (see figure 53) which populates by selecting “Cash” in the “Evidence Type,” is where the user can input the number of each denomination collected, i.e., $100 (3), $20 (6), $5 (13). The “Cash Details” window will add all the input denomination and present the user with a “Bill Total, Coin Total, and Grand Total.”
Figure 53
Drugs
The “Drug Details,” (see figure 51)which populates by selecting “Drugs” in the “Evidence Type,” is where the user can select one of the listed options (Quantity, Weight, Volume) to better describe the drug evidence collected. The corresponding boxes are for inputting the value of the selected option i.e., Quantity [100] or Quantity [100 pills], Weight [.25] or Weight [.25 oz], Volume [2 Tbs] or Volume [2 tbsp].
Figure 51
Guns
The “Gun Details,” (see figure 52) which populates by selecting “Guns” in the “Evidence Type,” is where the user can input data for “Make,” “Model,” Caliber,” and “Serial Number.”
Figure 52
Evidence Description
The “Evidence Description” field will accept more than 4 million characters and is best used to describe, in more detail, the evidence collected. Please understand, the “Evidence Type” should be a simple word to describe the evidence, i.e., “Drugs.” user to list the finer details of the evidence collected and will accept as many as 4 million characters.
Date of Recovery
The “Date of Recovery” must be entered in a mm/dd/yyyy format, the user can also add a time in the format of hh:mm if desired. The date and time pertain to when that piece of evidence was collected. The time can be entered in a regular or military configuration. If military time is used, it will be converted into regular time and the appropriate AM/PM designation will be added when the record is saved. If the user is using regular time, be sure to add the AM or PM. Otherwise, the application will. by default, save the record with an AM time.
Review Months
The “Review Months” field is used for assigning a “timer” to a piece of evidence the user wants to review for purging when the timer expires. This is a great tool designed to help users purge items from the evidence/property room and should be utilized.
Recovered By
The “Recovered By” field is for the name of the individual who collected that piece of evidence. This is a drop-down field the admin can add names to but can also accept free text. The user can type the first 2 characters of a name from the drop-down, and it will auto-fill the selection, or the user can choose directly from the drop-down list.
Location of Recovery
The “Location of Recovery” field is a detailed description of the specific location where the evidence was collected. The user should input an address or a description of the location where the evidence was collected.
Transported By
The “Transported By” field is for the name of the person transporting that piece of evidence from where it was collected to the temporary or permanent storage location.
Reason Seized
The “Reason Seized” field is for entering the reason for which that piece of property is being retained, i.e., to be tested, holding for court, etc. This is a drop-down field but can also accept free text. Remember, free text can pollute the data with multiple entries spelled differently. The user can enter the first 2 characters of a word from the drop-down list, and it will auto-fill, or the user can choose an option directly from the drop-down list.
Temporary Location
The “Temporary Location” field is a drop-down list the admin will populate with the temporary location officers use to store evidence in before it is accepted into the evidence/property room by the evidence tech. The user can enter the first 2 characters of a location from the drop-down list, and it will auto-fill, or the user can choose a location from the drop-down list.
Evidence Room Location
The “Evidence Room Location” field is a drop-down list containing all locations in the evidence/property room. When an evidence/property room custodian collects a piece of evidence from the temporary location and verifies the information and evidence, they will then assign that evidence a location it will be stored in the evidence/property room. Assigning a location to a piece of evidence in the “Evidence Log” then saving that record, will simultaneously enter the record into the “Evidence Log” and log its first chain of custody record into the PMI Evidence Tracker™ application.
Case Status
The “Case Status” field has two options, “Active” or “Inactive.” These two radio buttons indicate whether a case is active or inactive, the default setting is “Active.” After data is entered for a particular piece of evidence and then saved, that evidence is now officially an “Active” piece of evidence.
Suspect
The “Suspect” field is for recording the name, address, and other important information pertaining to the suspect(s).
Disposition
The “Disposition” field is a drop-down list and is used to designate how evidence is to be disposed of when a case is closed and the evidence is no longer needed, or when an item is to be returned to its owner. The admin will need to populate the list with options used often by your department.
Date of Disposition
The “Date of Disposition” is a field the application automatically inputs a date and the time of when a piece of evidence was set to “Final Out.” This is something we will cover in the “Chain of Custody” tab of the PMI application. If a user tries to input a date and time into the “Data of Disposition” field they will get a message (see figure 55).
Figure 55
Dispose
The “Dispose” field (see figure 56) is an option that a user can select after it has been determined that the evidence is no longer needed and is ready to be permanently removed from the evidence room. By selecting “Dispose” the user can run a report listed in the “Reports” tab that will report all items that have “Dispose” selected.
Figure 56
User Fields
The fields labeled “User Field #1 – #4”are drop-down fields in the “Evidence Log” that function like the other drop-down fields where the list can be edited to fit the department’s needs as well as the header name. This allows for the admin to re-purpose the fields as needed. “User Fields #6 – #12”are text fields that scroll and are available for re-purposing by the admin user.
Notes
The “Notes” field is a free text field for inputting notes relative to the piece of evidence currently open in the “Evidence Log,” information concerning that piece of evidence, or notes pertaining to the case.
The “Evidence Log” has 31 fields that allow the user with the correct permissions to input data, 5 fields the application automatically adjusts, a date field that only accepts a date format, and the “Review Months” drop-down list. The following lists each field with the corresponding CHARACTER LIMITS.
Case Number – 25 (Scrolls)
Case Number 2 – 25 (Scrolls)
Case Number 3 – 25 (Scrolls)
Case Number 4 – 25 (Scrolls)
Tracking Number – 9 (Auto-filled by application)
Item# — 6 (Auto-fills with each item with the same case number)
Of – 6 (Auto-fills with each item with the same case number)
Victim/Complainant – 120 (Expands)
Offense – 25 (Drop-down list)
Offense Location – 99 (Address) (Expands)
Evidence Type – 25 (Drop-down list)
Evidence Description – 4,000,000 (Expands)
Date of Recovery – 00/00/0000 00:00 (Date and Time Format)
Review Months – 3 (Drop-down list)
Recovered By – 25 (Drop-down list)
Location of Recovery – 99 (Expands)
Transported By – 25 (Person’s name)
Reason Seized – 25 (Drop-down list)
Temporary Location – 25 (Drop-down list)
Evidence Room Location – 25 (Drop-down list)
Suspect – 120 (Expands)
Disposition – 25 (Drop-down list)
Date of Disposition – (Auto-filled once item is set to finale out)