
Audit Module – Evidence
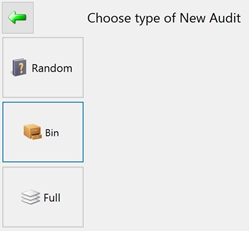
The “Audit Module” (see figure 107) enables the user to conduct audits using a tablet, laptop, or other such devices, making the process faster and more efficient than ever. If the user is not using the “Audit Module,” they will have to conduct the audit by hand. Hand audits will require the user to go into the evidence log to check missing items to see if they were batched out. The “Audit Module” includes specialized software accompanied with a small wireless barcode scanner to automate the process of conducting a Random, Bin, or Full Audit very quickly. It gives the user the ability to conduct the audit in real-time and will identify any items that are checked out, in the wrong location, or missing. Using the Audit Module can reduce the time it takes to conduct a full audit, from days to a few hours, plus the user will know the status of every item in real-time.
Random audit
When a user selects “Random Audit,” (Figure 107) they will need to choose what type of evidence to inventory. To select all evidence in the system, select “Add All” (see figure 108) at the bottom of the screen. To select a certain category, select the desired choice on the left, it will move to the right side of the screen. Then select next.

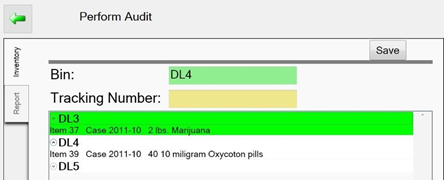
The application will randomly select several items from the database based on the quantity selected when setting up the “Audit Options” under the “Audit Tab.” The next step is to perform the audit. First, scan the bin location label (see figure 109) and then scan the tracking number. If the item is in the correct location, the system will show the item highlighted in green if it is present and in the correct location.
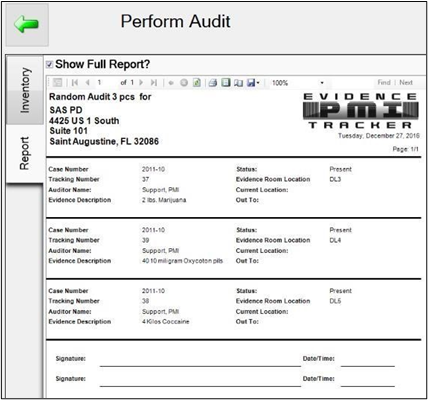
Once the audit is completed, it can be saved or printed in a report format (see figure 110). The report will present details about each piece of evidence and provide two signature lines for each officer, the officer performing the audit and the witnessing officer to sign at the bottom. After completion, the report should be saved or filed.
Bin Audit
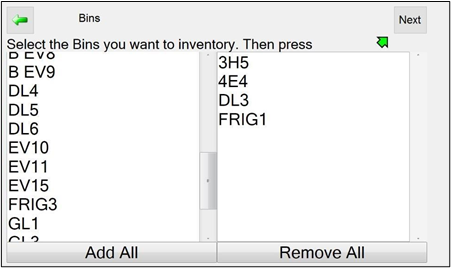
When a “Bin Audit” is selected, the user will need to select which “Bin(s)” to inventory from the left pane (see figure 111). Select each bin to audit and they will then appear on the right-side pane. Once all desired bin locations have been selected, select next, the user can then choose an evidence type.
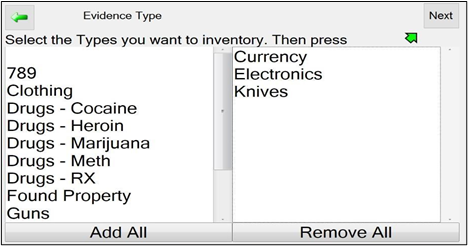
Next, the user can select an evidence type on the left pane. Once the user has selected the Evidence Type, they will move to the right pane (see figure 112). Select “Next” to perform the audit.
First the user will scan the “Bin Number,” (see figure 113) then scan the “Tracking Number.” If the item(s) is in the correct location and present, the item will be highlighted in green.

After the audit is complete, the user can save, and or, print the results. To run a report, select the “Report” tab at the left; the following message will display (see figure 114).
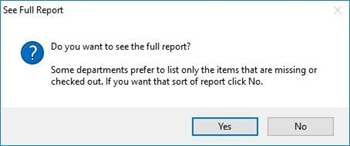
If the user wants a report to list all evidence, including those that are present, missing, or checked out they will need to select “Yes.” However, if the user only wants to view items missing or checked out, they will need to select “No.”
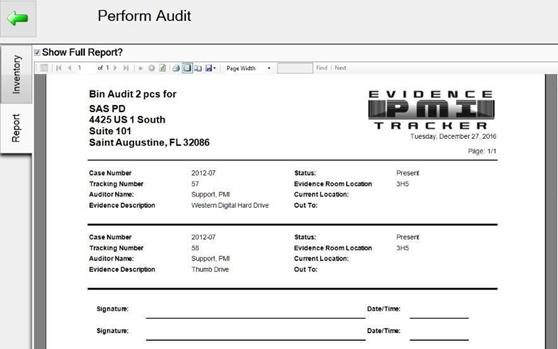
The report (see figure 115) gives details about each piece of evidence and provides two signature lines, one for the officer who performed the audit and the other for the witnessing officer. After completing, the report should be saved kept on file.
Full Audit
When the user selects a “Full Audit,” it will list all “Bin” locations (see figure 116) in the evidence room. First the user will scan the “Bin Number,” then scan the “Tracking Number” for each piece of evidence in that bin.

Once the user has completed the audit, they can save, and or, print the results. For results in a report like format, the user will need to select the “Report” tab on the left of the screen and follow the directions on the screen. If the user wants the report to list all evidence, including those that are present, missing, or checked out, they will need to select “Yes;” however, if they only want to view items missing or checked out, select “No.”
The report (see figure 117) will provide the user with details about each piece of evidence and has the ability to add two signature lines, one for the officer performing the audit and the other for the witnessing officer. After completing, this report should be saved and kept on file.
