
Entering Evidence
The “Evidence Log,” modeled after the commonly used evidence bag to facilitate moving from a paper system to a computer application. Once a user selects “Log” under the “Evidence” tab, the “Evidence Log” will appear with information from the last record input into the application. To enter a new record, the user will need to select the “Add” option from the left pane area. After selecting “Add,” then the “Add” option will appear grayed out, then “Cancel” and “Save” will then become selectable (see figure 28). The user will start by inputting a “Case Number” then hit the “Tab” key on the keyboard to move to the next field. (Remember the “Tracking Number,” “Item#” and “Item Of” will auto-fill by the application.)
The next required field (as indicated by the yellow shaded box) is “Offense.” The user will then need to input information into “Offense” which is a drop-down list in which the user can select a preadded offense (If the admin user added the offenses to the drop-down list the user should not enter a new word or phrase).
There are 7 fields that require information to save a record: “Case Number,” “Offense,” “Offense Location,” “Evidence Type,” “Evidence Description,” “Date of Recovery,” and “Recovered By.” If one of these fields is missing data, the user cannot save the record. Please refer to the “Evidence Log” then “Evidence Log Fields” for the data character limits for each field.
Case Number
The “Case Number” field will accept up to 20 characters and is the number that determines the “Item#” and “Of” i.e., “Item#”_2_ “Of” _3_ . The application provides fields for additional case numbers such as, “Case Number 2,” “Case Number 3,” and “Case Number 4.” These fields can be used for additional case numbers or can be renamed and repurposed for other needs. These fields can also be used to input another case number assigned by an outside entity such as the “ATF.”
Tracking
The “Tracking Number” is a unique number that is automatically generated by the application. The “Tracking Number” is unique, will never be duplicated, and cannot be manipulated. The “Tracking Number” ensures the integrity of the PMI application. The “Tracking Number” is not assigned until a record is saved.
Item Number
The “Item#” indicates what item the user is currently viewing, adding, or editing as the “Of” number is automatically adjusted as items are added to a case number. These numbers correlate with the case number. If an item input has the same case number, the “Item# and Of” will adjust as pieces are added.
Victim/Complaint
The “Victim/Complainant” field is an expandable field for the user to input a name and an address or two names and an address.
Offense
The “Offense” field is a drop-down list that the admin user will populate with data for officers to choose from. The admin user building the list for officers to choose from helps keep the database clean and uniform.
Offense Location
The “Offense Location” is an expandable field where the user will input the address where the offense occurred or a description of the location if no address is available.
Evidence Type
The “Evidence Type” field is a drop-down field, and the admin user will populate the list with evidence types the department commonly encounters. (The admin user can add to the list, but no evidence type assigned to a record can be removed from the list, the application will not allow it.
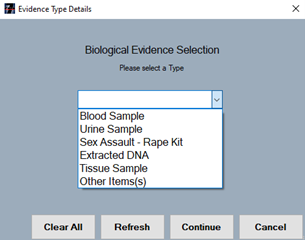
Biological
The “Biological Details,” (see figure 54) which populates by selecting “Biological” in the “Evidence Type,” is where the user can select one of 6 options from the drop-down list provided i.e., “Blood Sample, Urine Sample, Sexual Assault – Rape Kit, Extracted DNA, Tissue Sample, Other Item(s).”
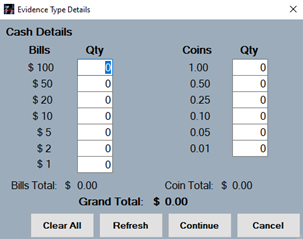
Cash
The “Cash Details,” (see figure 53) which populates by selecting “Cash” in the “Evidence Type,” is where the user can input the number of each denomination collected, i.e., $100 (3), $20 (6), $5 (13). The “Cash Details” window will add all the input denomination and present the user with a “Bill Total, Coin Total, and Grand Total.”
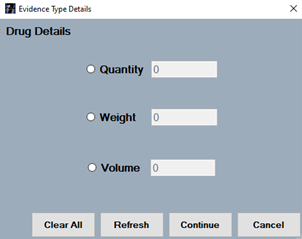
Drugs
The “Drug Details,” (see figure 51)which populates by selecting “Drugs” in the “Evidence Type,” is where the user can select one of the listed options (Quantity, Weight, Volume) to better describe the drug evidence collected. The corresponding boxes are for inputting the value of the selected option i.e., Quantity [100] or Quantity [100 pills], Weight [.25] or Weight [.25 oz], Volume [2 Tbs] or Volume [2 tbsp].
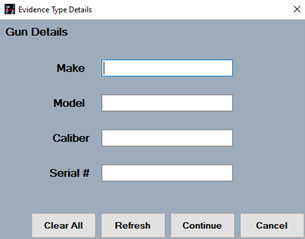
Guns
The “Gun Details,” (see figure 52) which populates by selecting “Guns” in the “Evidence Type,” is where the user can input data for “Make,” “Model,” Caliber,” and “Serial Number.”
Evidence Description
The “Evidence Description” field will accept more than 4 million characters and is best used to describe, in more detail, the evidence collected. Please understand, the “Evidence Type” should be a simple word to describe the evidence, i.e., “Drugs.” user to list the finer details of the evidence collected and will accept as many as 4 million characters.
Date of Recovery
The “Date of Recovery” must be entered in a mm/dd/yyyy format, the user can also add a time in the format of hh:mm if desired. The date and time pertain to when that piece of evidence was collected. The time can be entered in a regular or military configuration. If military time is used, it will be converted into regular time and the appropriate AM/PM designation will be added when the record is saved. If the user is using regular time, be sure to add the AM or PM. Otherwise, the application will. by default, save the record with an AM time.
Review Months
The “Review Months” field is used for assigning a “timer” to a piece of evidence the user wants to review for purging when the timer expires. This is a great tool designed to help users purge items from the evidence/property room and should be utilized.
Recovered By
The “Recovered By” field is for the name of the individual who collected that piece of evidence. This is a drop-down field the admin can add names to but can also accept free text. The user can type the first 2 characters of a name from the drop-down, and it will auto-fill the selection, or the user can choose directly from the drop-down list.
Location of Recovery
The “Location of Recovery” field is a detailed description of the specific location where the evidence was collected. The user should input an address or a description of the location where the evidence was collected.
Transported By
The “Transported By” field is for the name of the person transporting that piece of evidence from where it was collected to the temporary or permanent storage location.
Reason Seized
The “Reason Seized” field is for entering the reason for which that piece of property is being retained, i.e., to be tested, holding for court, etc. This is a drop-down field but can also accept free text. Remember, free text can pollute the data with multiple entries spelled differently. The user can enter the first 2 characters of a word from the drop-down list, and it will auto-fill, or the user can choose an option directly from the drop-down list.
Temporary Location
The “Temporary Location” field is a drop-down list the admin will populate with the temporary location officers use to store evidence in before it is accepted into the evidence/property room by the evidence tech. The user can enter the first 2 characters of a location from the drop-down list, and it will auto-fill, or the user can choose a location from the drop-down list.
Evidence Room Location
The “Evidence Room Location” field is a drop-down list containing all locations in the evidence/property room. When an evidence/property room custodian collects a piece of evidence from the temporary location and verifies the information and evidence, they will then assign that evidence a location it will be stored in the evidence/property room. Assigning a location to a piece of evidence in the “Evidence Log” then saving that record, will simultaneously enter the record into the “Evidence Log” and log its first chain of custody record into the PMI Evidence Tracker™ application.
Case Status
The “Case Status” field has two options, “Active” or “Inactive.” These two radio buttons indicate whether a case is active or inactive, the default setting is “Active.” After data is entered for a particular piece of evidence and then saved, that evidence is now officially an “Active” piece of evidence.
Suspect
The “Suspect” field is for recording the name, address, and other important information pertaining to the suspect(s).
Disposition
The “Disposition” field is a drop-down list and is used to designate how evidence is to be disposed of when a case is closed and the evidence is no longer needed, or when an item is to be returned to its owner. The admin will need to populate the list with options used often by your department.
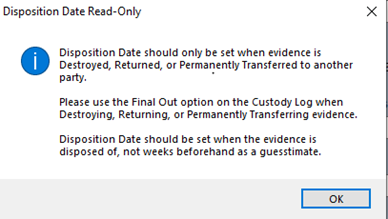
Date of Disposition
The “Date of Disposition” is a field the application automatically inputs a date and the time of when a piece of evidence was set to “Final Out.” This is something we will cover in the “Chain of Custody” tab of the PMI application. If a user tries to input a date and time into the “Data of Disposition” field they will get a message (see figure 55).
Dispose
The “Dispose” field (see figure 56) is an option that a user can select after it has been determined that the evidence is no longer needed and is ready to be permanently removed from the evidence room. By selecting “Dispose” the user can run a report listed in the “Reports” tab that will report all items that have “Dispose” selected.

User Fields
The fields labeled “User Field #1 – #4” are drop-down fields in the “Evidence Log” that function like the other drop-down fields where the list can be edited to fit the department’s needs as well as the header name. This allows for the admin to re-purpose the fields as needed. “User Fields #6 – #12” are text fields that scroll and are available for re-purposing by the admin user.
Notes
The “Notes” field is a free text field for inputting notes relative to the piece of evidence currently open in the “Evidence Log,” information concerning that piece of evidence, or notes pertaining to the case.