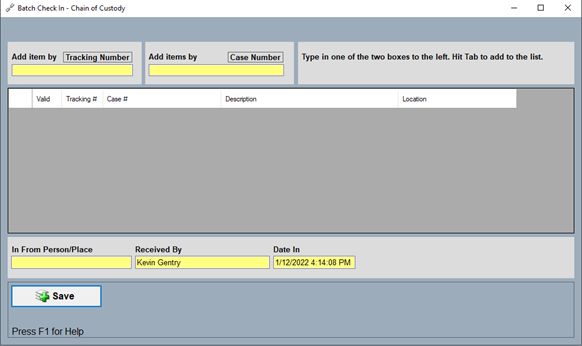
The “Batch In” (see figure 60) option is used to batch MULTIPLE items into the evidence/property room. Remember all items the user wants to batch into the application, need to be going to the same “Evidence Room Location.” The user will need to either scan the tracking number on the evidence label or input the tracking number via the keyboard into the yellow shaded box labeled “Tracking Number.”
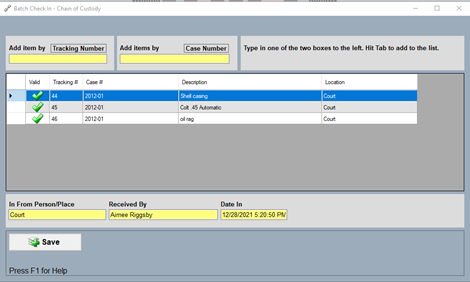
If the items can be batched into the application, there will be a green “checkmark” shown in the “Valid” column as shown in figure 62. If the user receives a red “X” in the “Valid” column, the user will need to search the chain of custody log and verify the item was batched out.
The user will then need to input information for “In From Person/Place,” and “Received By.” Then the user will need to select “Save.” (see figure 62)
Figure 62
batch out
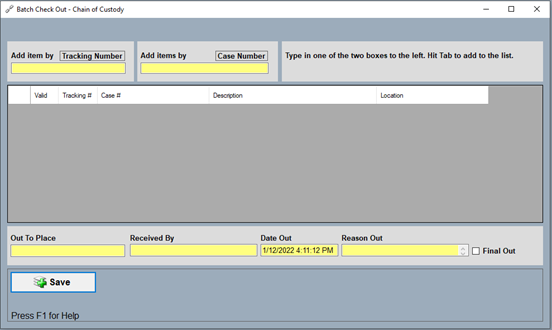
The “Batch Out” (see figure 64) option is used to batch items or evidence out of the evidence/property room, for example, if an item is returned to the owner, the user would use this option. The “Out To Place” would be the disposition of that item, i.e., “OWNER.” The “Received By” would be the person accepting the item from the evidence/property room. The “Date Out” is automatically stamped by the PMI application. The “Reason Out” would be information the department needs to process the item out, i.e., “Court Order.”
Figure 63
The “Case Number” option should only be used if the user is batching ALL pieces assigned to the case number in or out and to the same destination.
final out
The “Final Out” checkbox is used for items that will not be returned to the evidence/property room. For example, if a case is closed and some of the items were not used as exhibits in the case, the case is closed and there is a recorded conviction. The custodian will use the “Final Out” checkbox to remove the item from the evidence log and end the chain of custody.
The “Chain of Custody” tab will have three options the user can choose from. The first option in the list is “Log,” (F6) followed by “Batch Out,” (see figure 59)and then, “Batch In” (see figure 60).
The first option, “Log,” (see figure 58) is the log that displays the chain of custody the application records when a user batches in or out a piece of evidence. This is the menu option that keeps track of each piece of evidence as it is batched in or out of the application from the evidence room. This is one of the most important tools used for maintaining the integrity of the chain of custody, because of its critical importance, only designated property room custodians should have permission for “Chain of Custody.”
Figure 58
Figure 59
Figure 60
These windows look identical but there are a few differences. Please notice the “Batch Out” window has two additional options, “Reason Out” and a “Final Out” check box. These windows will perform differently as to not allow the user to batch an item out when they mean to batch an item in.
Custody Log
The “Log” window under the “Chain of Custody” tab (see figure 58) has a few options the user can choose from: “Check In/Out,” “Batch In,” “Batch Out,” “Find,” “Save,” “Cancel,” and “Delete.”
When the user enters the “Log” for the first time, there is already information in the matrix (see figure 58) that contains data about pieces of evidence that have been assigned an “Evidence Room Location.” Remember, when an evidence room custodian assigns a piece of evidence and evidence room location, that starts the first logged chain of custody record in the application. The “Log” records the movement of each piece of evidence when it is batched in or out of the evidence room.
Check In/out – allows the user to enter a tracking number to move a piece of evidence in or out of the property room.
Batch In / Batch Out – allows the user to check MULTIPLE items in or out of the evidence/property room.
Find – enables the user to search for chain of custody records by “Case Number” or “Tracking Number.”
Save – after all information has been entered into the appropriate fields, the record must be saved. After the “Save” function has been completed, the new record will be added to the top of the information matrix at the bottom of the screen.
Cancel – allows the user to clear information entered on the screen before it has been saved.
Delete – allows the user to permanently remove a record from the application. If a user deletes a chain of custody record, it will be permanently removed from the active database and cannot be retrieved.
Check in/out
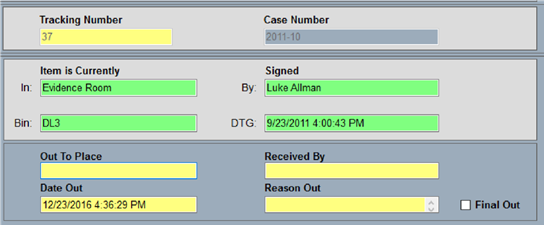
The “Check In/Out” (see figure 61) option is used to check a single piece of evidence in or out of the application. First, scan the tracking number bar code found on the evidence label or the user can input the tracking number into the yellow shaded box. The application will review the database and determine if the item is currently batched in or out of the evidence/property room, the cursor will then move to the next appropriate screen.
Figure 61
Batch In
The “Batch In” (see figure 60) option is used to batch MULTIPLE items into the evidence/property room. Remember all items the user wants to batch into the application, need to be going to the same “Evidence Room Location.” The user will need to either scan the tracking number on the evidence label or input the tracking number via the keyboard into the yellow shaded box labeled “Tracking Number.”
If the items can be batched into the application, there will be a green “checkmark” shown in the “Valid” column as shown in figure 62. If the user receives a red “X” in the “Valid” column, the user will need to search the chain of custody log and verify the item was batched out.
The user will then need to input information for “In From Person/Place,” and “Received By.” Then the user will need to select “Save.”
Figure 62
Batch Out
The “Batch Out” (see figure 59) option is used to batch items or evidence out of the evidence/property room (see figure 63), for example, if an item is returned to the owner, the user would use this option. The “Out To Place” would be the disposition of that item, i.e., “OWNER.” The “Received By” would be the person accepting the item from the evidence/property room. The “Date Out” is automatically stamped by the PMI application. The “Reason Out” would be information the department needs to process the item out, i.e., “Court Order.”
Figure 63
The “Case Number” option should only be used if the user is batching ALL pieces assigned to the case number in or out and to the same destination.
Final Out
The “Final Out” checkbox is used for items that will not be returned to the evidence/property room. For example, if a case is closed and some of the items were not used as exhibits in the case, the case is closed and there is a recorded conviction. The custodian will use the “Final Out” checkbox to remove the item from the evidence log and end the chain of custody.